Key Takeaways
- Preparation:
- Gather essential supplies: miniature models, acrylic paints, fine detail brushes, hobby knife, sprue cutters, and primer.
- Clean the miniature by removing mold lines and excess plastic with a hobby knife or sandpaper.
- Assemble the miniature carefully, ensuring proper fit before gluing.
- Priming:
- Apply a thin, even coat of primer to help paint adhere and reveal surface details.
- Choose between spray primer or brush-on primer based on your preference.
- Base Coating:
- Begin painting from inner areas and work outward.
- Use thin layers of base colors, letting each layer dry to preserve fine details.
- Detailing and Shading:
- Add shadows and highlights to create depth and realism.
- Use dry brushing for highlights and washes for shading recessed areas.
- Finishing Touches:
- Carefully paint small details like eyes and accessories to enhance realism.
- Seal the finished piece with a clear varnish to protect your work.
- Tips for Success:
- Take breaks to maintain precision and avoid fatigue.
- Keep brushes clean to ensure control over application.
- Try different techniques and color combinations to grow your skills.
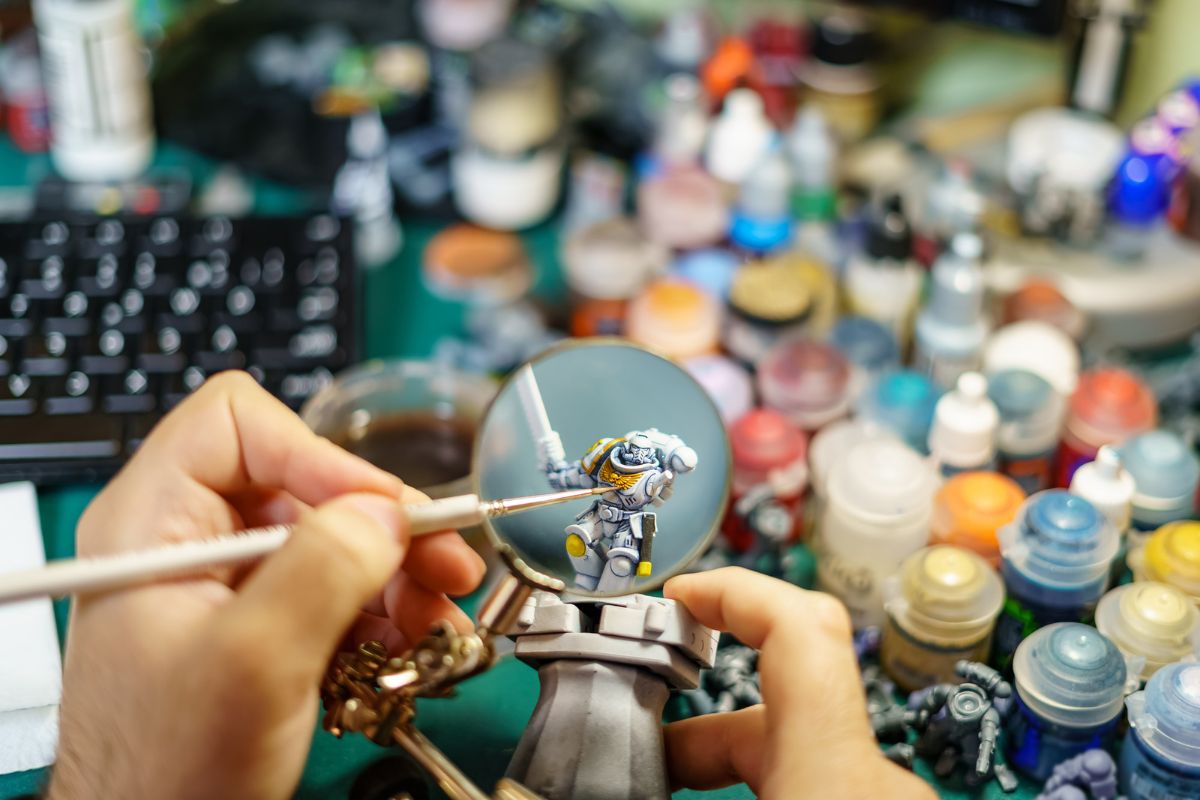
Throughout the years many people have collected miniatures. These days you will find a lot of collectors enjoying putting together and painting their own miniatures.
If you have never painted miniatures before, you might be surprised to learn just how much goes into this art. Not only do you have to put the pieces together, but you also have to go through many steps to paint them properly.
Putting together a miniature is much like putting together a model car kit. You have to separate all of the pieces and remove any extra plastic. Then you have to assemble the miniature, and then the fun part begins, which is the painting.
Today we are going to take a look at the steps involved in painting miniatures. Keep reading to learn more.
Getting Started with Mini Painting
There are a few steps you will need to take before you can start painting. The first step in the process is to gather all of the supplies you are going to need.
You will need to have the right paints, brushes, and of course, a miniature. When it comes to paints, I suggest using model paints or paints that come in kits specifically for painting minis. You can also use acrylic paints. I don’t suggest using craft paints, just because they tend to be flat-looking.
You will also need some cutting tools to get rid of the extra bits of plastic, such as mold lines, just as you would with a model car.
The first part of the painting process is to apply a paint primer all over the model. Then you can get into the base coat, followed by contrast shadows, contrast highlights, and details.
Some Assembly Required
Not all miniatures are ready to paint right out of the box. Quite often you will be required to assemble them before you can begin painting.
You will need to clip all of the pieces off the sprue (the frame the pieces are molded on). I suggest getting a good pair of sprue snips for this purpose.
You will also need to have a sharp knife, such as an X-acto knife, to get rid of any mold lines or other bits of extra plastic. Once you have removed the excess plastic, you can use some sandpaper to scrape away any other lines or extra plastic that you want to get rid of.
It is a good idea to do a trial run before completing the assembly. Put all of the pieces together to make sure everything is there and that it all fits properly. Once you have done this, you can start gluing the pieces together.
There may be some pieces that you want to paint before assembling the miniature. That is completely up to you, and in some cases, it may be easier to paint these pieces first and then put them onto the miniature.
Miniature Painting Techniques and Tips
So, now that your miniature is put together, it is time to begin the painting process. I suggest buying paints that are made for miniatures. Some miniature kits even come with all of the paints you will need.
#1. Use a Primer
The first step is to apply at least two coats of primer. You can use a spray primer or a brush-on primer for this. Be sure to apply the primer in thin coats that are smooth and even.
If you are using a brush-on acrylic primer, it is a good idea to thin it down with a bit of water to achieve that smoothness.
If you are using a spray primer, hold the can about six to 12 inches from the miniature, and sweep the spray across the miniature. Allow one side to dry according to the directions on the bottle or spray can, and then turn over the miniature to prime the other side.
Once you have added at least a couple of coats of primer and allowed them to completely dry, you can start painting.
#2. Apply a Base Coat
In this step, you will be applying the main colors on the miniature. Start working from the inside, and then work your way out.
For instance, let’s say your miniature has clothing, but also has some flesh showing. You would want to paint the flesh first, and then move on to the next layer, and so on and so on.
Make sure that you work with one color at a time. Quite often you will find that many parts are painted with the same color, such as boots and gloves.
Painting these parts together will save you a lot of time and hassle. I suggest starting with the colors that will be used the most.
You will need to be careful about how much paint you put on the brush, as well as the consistency of the paint. It will take a bit of practice to be able to get a smooth paint application. I often suggest practicing on pieces that aren’t going to be part of a collection.
Your paint should not be too thick, nor should it be so thin that it is runny. It should be just thick enough so there is no resistance and it moves around the palette.
#3. Paint on the Highlights and Shadows
You have a couple of options at this point. All of the colors have been painted on, and you can leave it just like this if you wish. Or, you could get into some more detail work.
Many people like to add more details, including highlights and shadows. This will make miniatures stand out and look even more realistic.
Look closely at a miniature that has already been painted. You will notice that there are highlights and shadows and that each painted part has darker and lighter areas.
To create contrasting shadows, use a thin wash of black or brown. The paint should be translucent, so the black or brown doesn’t overpower the colors.
Once you have created shadows, it’s time to create some highlights. For this step, all you need to do is add some lighter colors that will highlight the other colors. There are many brands of paint for miniatures that have colors that are created to highlight one another.
#4. Don’t Forget the Base
Your miniature may or may not come with a base. Either way, it needs to have one, so you may have to buy or make a base.
You can simply paint the base black, or you can add some details and texture. There are paints specifically made for this, such as Vallejo Thick Mud, which can be colored by adding a bit of paint.
Then you can add a few things to create even more texture. For instance, when I paint miniature fairies, I like to use some fake moss to make the base look like it is actual ground.
#5. Paint the Details
You could consider your miniature finished at this point. Or, you may want to go in and make some of the smaller details stand out.
For example, you should paint the figure’s eyes and other facial features. Otherwise, it just isn’t going to look quite right. This is where you can make your miniatures look truly unique, even if they do come from kits.
How to Paint D&D Miniatures
The Dungeons & Dragons Miniatures Game is fun to play. Painting D&D miniatures can be a fun and creative process.
Here’s a step-by-step guide to get you started:
Gather Supplies
Get acrylic paints, paintbrushes of various sizes, a palette, and a cup of water.
Clean the Miniature
Use soap and water to clean off any mold release agent from the miniature. Let it dry completely.
Prime the Miniature
Apply a thin layer of primer to the miniature. This helps the paint adhere better. Choose a color that complements your desired paint scheme.
Plan the Color Scheme
Decide on the color scheme for your miniature. Use reference images or concept art for inspiration.
Base Colors
Start with the base colors. Use larger brushes for the main areas and smaller brushes for details.
Layering and Highlights
Layer lighter shades on top of the base colors to add depth and highlights.
Washes and Shadows
Apply washes (thinned-down paint) to create shadows and enhance details.
Fine Details
Use smaller brushes to add intricate details, like eyes or intricate patterns.
Varnish
Once the paint is dry, apply a clear varnish to protect the paint job and add a nice finish.
Base the Miniature
Create a base for your miniature using materials like cork, sand, or textured paint.
Remember, practice makes perfect! Don’t be discouraged by mistakes, and enjoy the process of bringing your D&D miniatures to life with your artistic touch. Happy painting!
Final Thoughts
Once you have gone through all of the steps of miniature painting mentioned in this post, your miniature is ready to display. You may be wondering if you should varnish it.
This is not a necessary step, so it is up to you whether or not to use varnish. If you are going to be handling miniatures regularly, such as for gaming, it is a good idea to add one or two coats of varnish.
I recommend using a spray varnish so you can get nice, even coats without any brush marks.
And that’s all there is to painting miniatures. As I mentioned, it is going to take some practice, but as long as you follow the basics you will be able to master this art in no time.
*image by josemiguelsangar/depositphotos
Sari Green is a semi-professional artist and professional writer. She has been hosting paint & sip parties for the past couple of years, and truly enjoys helping other people to create their very own masterpieces. She loves to create, and you never know what she’s going to come up with next!